7 min read / 27 March 2024 / yasmin sharp
How to Make Wax Melts
Discover the simple joy of making your own wax melts to infuse your home with personalised scents.
Share this post
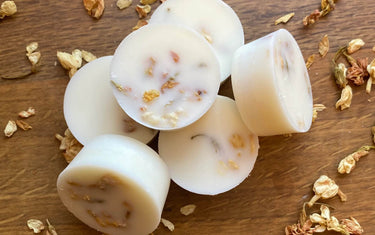
Wax melts can be seen as the little sister of scented candles, giving you a creative and exciting new way to enjoy your favourite essential oil.
And when it comes to learning how to make your own wax melts, there isn’t too much ground to cover, so no matter how much experience you have you can quickly become a master wax melt maker.
We’ve put everything you need to know about making wax melts right here, so feel free to dive in and get started.
What Are Wax Melts?Wax melts are pieces of wax that have been melted and scented and are often made in a variety of different shapes and sizes, with many people also adding their own colouring and decoration as the finishing touch. You can think of it as another way of moulding candles, but instead of burning a tall stick of wax, it is shaped into something fun and unique. The major difference is that there is no wick, so it cannot be lit in the same way. Instead, wax melts are heated using an oil burner, allowing the scent to emit into the air for people nearby to enjoy. |

How to make wax melts
Before you start making wax melts, you’ll need to gather together some key ingredients and a few pieces of equipment.
Use our checklist below to see what you already have and what you may need to buy:
- Essential oils or fragrance oils
- Candle wax
- Candle dye (option)
- Clamshell moulds or a silicone ice cube tray
- Double boiler (you can make your own)
- Stirring utensil for the wax
- Pouring jug
- Weighing scales
- Thermometer
Steps on how to make wax melts
It only takes 5 simple steps to make your own wax melts. Use our guide below to get started:
- Prepare the recipe: Dealing with hard and melted wax can get quite messy, so make sure you have a clean surface and enough room to work with. Weigh 100g of wax for this recipe and set it aside for the first step.
- Melt the wax: Pour about two inches of water into a pot and heat until simmering. Place a heat-resistant container that fits snugly into the pot just above the water (make sure it doesn’t touch the water) and add the wax. Heat to 70°C and gently stir to help the melting process. You can use your thermometer to keep an eye on the temperature.
- Add some colour: If you want to add some colour to your melts, this is where it needs to be mixed in. When you reach 70°C, carefully add the candle dye to the melted wax and gently stir until it has spread evenly and completely dissolved. A 10g bag of candle dye will colour about 5 kg of wax, so you will only need about 0.2% of the dye – not very much at all. If you are not sure, check the instructions provided by the dye manufacturer.
- Add your essential oil: You can now add in your chosen essential oil for the wax melt. Bring the temperature down to 65°C and pour in the essential oil(s) whilst continuing to stir. For 100g of wax, 1% of essential oil will be enough to produce a strong enough scent.
- Pour out the wax: Once the wax has melted and the colour and oil has been added, you can take the wax off the heat. Pour carefully into your wax melt mould where the wax will start to set. It usually takes around 3-4 hours for the wax to fully cool and harden.
Your wax melts will also need to cure – a process that allows the essential oil and colouring to spread evenly and settle in the wax. Store the melts in a cool, dark space for a couple of weeks and they will then be ready to enjoy.

How to Use Wax Melts
If you want to know how to melt candle wax once the melt is ready, the process couldn’t be easier, as you only need an oil burner to help them release their fragrance.
Simply place the wax melt (or melts, if you want a stronger fragrance) at the top of the oil burner and light the candle underneath.
The heat from the flame will slowly start to melt the wax melt, releasing the scent into the air for you to enjoy.
How Can I Make My Wax Melts Last Longer?
Use the tips below to help your wax melts last longer:
- As we mentioned above, store your wax melts in a cool, dry space away from direct sunlight and heat sources. This should help them retain the strength of its fragrance when you are ready to add it to the burner.
- It’s a good idea to store your wax melts in a Tupperware container or glass jar. Avoid using cardboard or paper packaging as these materials can absorb the fragrance which will reduce their scent.
- Soy, paraffin or ParaSoy are the most common wax for molds, as these tend to provide the best quality burn rates, so try avoiding using other types of wax to ensure you get the best results.
- When it comes to the quality and concentration of the scent, it may be a case of trial and error in the early stages as you discover the right number of essential oils to add to the mixture. If you achieve a strong scent with the melt, it is also likely that it will last when stored correctly for an extended period.
Do Wax Melts Lose Their Scent If They Are Not Used?
Whilst wax melts can last for up to 2 years before being burnt, we recommend that you use them within a 12-month period to get the best fragrance experience.
The wax will last for longer, but like any fragranced product, the effectiveness of the scent can start to fade over time.

How Do I Change an Old Wax Melt?
Once your wax melt has finished burning, wait for it to cool in the burner before touching it.
Then, use a spoon to remove the wax and any leftover pieces that may have fallen off.
When you have removed most of the wax, use warm, soapy water to wash away any leftover residue. Leave the burner to dry, and then you can melt a new wax melt in the tray when you are ready.
Wax Melts Frequently Asked Questions
Are wax melts the same as candles?
Although wax melts also rely on wax to release their fragrance, they do not work in the same way as candles.
The major difference is that wax melts do not require a wick to melt the wax.
Instead, they are placed above a small heat source in an oil or electric burner, which serves to melt the wax and release the fragrance into the air.
They are generally seen as a safer alternative to candles and can be made in a wide variety of shapes, sizes, colours and scents.
What is the best wax for wax melts?
Much like making your own candles, there are a few different types of wax you can use to make wax melts.
Soy wax is usually the most popular choice as it is natural, biodegradable and eco-friendly.
Beeswax is another good natural choice, as is palm wax.
Paraffin wax is often used in commercial wax melts, but is not natural and can release harmful toxins, so is perhaps best avoided.
How do I remove the wax from the mould?
Some moulds are more difficult to manipulate than others, which can make it harder to remove the wax once it has set and cured.
A neat trick to use is to place the melt in the freezer for about an hour, which should make it easier to remove as wax shrinks in the cold, leaving enough room to wedge it out without causing any damage.
How long do wax melts last?
A wax melt can last anywhere between 3 hours and 3 days, depending on several factors.
It depends where the melt is positioned, the surrounding temperature of the room and the type of wax used to make them.
In terms of shelf life, most wax melts should last for over 12 months without losing their fragrance, provided they are stored correctly in a dry, dark, cool space and kept dust and dirt free when not in use.
Can I increase the scent throw by adding more essential oils?
Adding more essential oils to your wax melts won’t always be enough to improve the scent throw.
If you are burning a wax melt and the scent is not strong enough, it is probably because there was an imbalance created in the recipe, with either too much wax or too little fragrance used.
It can also be affected by the quality of the oils you used, which is why it is always important to buy from a reputable seller that can guarantee a better-quality fragrance.

The more often you make wax melts, the easier it gets, and you can start venturing into different mould shapes and extending the colour palette.
Wax melts work just as well with fragrance oils as they do with essential oils, so feel free to change things up whenever you want.
Just be sure to take the right safety precautions when handling your essential oils and hot melted wax and the rest should take care of itself.

